DIY Solar Setup for Tiny Homes: Complete Guide (2025)
Learn step-by-step how to design, size, and install an efficient solar po
wer system for your tiny home. Everything you need to know for a reliable DIY solar setup in 2025.

In This Article
- 1 Introduction
- 2 1. Calculate Your Tiny-Home Load (Energy Audit)
- 3 2. Size the Solar Array
- 4 3. Choose the Battery Bank
- 5 4. Select Charge Controller & Inverter
- 6 5. Parts List & Shopping Links (2025 Prices)
- 7 6. Step-by-Step Installation
- 8 7. Maintenance & Monitoring
- 9 8. Real-World Example Build
- 10 9. Common Mistakes (and How to Avoid Them)
- 11 10. FAQs
- 12 Resources
- 13 Conclusion
Introduction
Tiny homes are more than a lifestyle trend—they’re freedom on wheels (or skids) and the poster-child for sustainable living. But even the most efficient 200-sq-ft house needs electricity for lighting, refrigeration, water pumps, laptops, and the all-important Wi-Fi router.
A DIY off-grid solar setup lets you:
- Cut recurring costs—no monthly utility bill or noisy generator fuel.
- Live anywhere—rural acreage, backyard ADU, mountain plot.
- Shrink your carbon footprint—zero-emission energy 365 days a year.
This guide walks you through every decision—from sizing loads to bolting down panels—so you can install a bullet-proof solar setup without hiring contractors.
1. Calculate Your Tiny-Home Load (Energy Audit)
1.1 List Every Electrical Appliance
Create a spreadsheet with Watt rating × hours/day for each device. A typical tiny-home baseline:
| Appliance | Watts | Hours/Day | Wh/Day |
|---|---|---|---|
| LED lighting (6 bulbs) | 60 | 4 | 240 |
| Mini-fridge | 70 (avg) | 24 | 1 680 |
| Water pump | 40 | 0.5 | 20 |
| Laptop + phone charging | 80 | 3 | 240 |
| Vent fan | 30 | 4 | 120 |
| Total | 2 300 Wh/day |
(Need help? Use our free Solar Load Calculator in the “Resources” section below.)
1.2 Factor In System Losses
Solar controllers, batteries, and inverters are ~85 % efficient overall.
Adjusted daily demand = 2 300 Wh ÷ 0.85 ≈ 2 700 Wh/day
2. Size the Solar Array
2.1 Determine Peak-Sun Hours
Look up your location on the NREL PVWatts map (external) → https://pvwatts.nrel.gov.
- Example: Asheville, NC ≈ 4.6 PSH (average annual)
2.2 Array Sizing Formula
Watts = (Daily Wh ÷ PSH) × Design Margin (1.2)
For 2 700 Wh/day in 4.6 PSH:
Raw size: 2 700 ÷ 4.6 ≈ 587 W
Final (20 % margin): 587 × 1.2 ≈ 700 W
Recommendation: Install 700-800 W of monocrystalline panels (e.g., seven Renogy 100 W panels).
2.3 Panel Type Comparison
| Type | Pros | Cons |
|---|---|---|
| Rigid mono | Highest efficiency, cheapest per watt | Heavier |
| Flexible | Lightweight, conforms to curved roof | Lower life span |
| Portable folding | Removable, tilt anywhere | More expensive |
3. Choose the Battery Bank
3.1 AGM vs. LiFePO₄
| Feature | AGM Lead-acid | LiFePO₄ Lithium |
|---|---|---|
| Cycle life (80 % DoD) | 400–600 | 3 000–5 000 |
| Usable DoD | 50 % | 90 % |
| Maintenance | None | None |
| Cost per usable kWh | $300–$400 | $200–$250 (after lifespan) |
Verdict: LiFePO₄ wins on long-term cost and weight.
3.2 Battery Capacity Sizing
Battery (Ah) = (Daily Wh × Days Autonomy) ÷ (System Voltage × Usable DoD)
For two cloudy-day autonomy (2 × 2 700 Wh) on a 24 V LiFePO₄ bank (90 % DoD):
Battery Ah = 5 400 Wh ÷ (24 V × 0.9) ≈ 250 Ah @ 24 V
A single Battle Born 24 V 270 Ah battery is perfect.
4. Select Charge Controller & Inverter
- MPPT Controller sized at 40–60 A for 24 V (Victron SmartSolar 100/50 is popular). External Victron blog post for detailed wiring tips.
- Pure-sine inverter sized 1.5× peak load → 3 000 W surge / 2 000 W continuous (e.g., AIMS 2000 W PSW inverter).
5. Parts List & Shopping Links (2025 Prices)
| Component | Example Model | Qty | Est. Price |
|---|---|---|---|
| 100 W monocrystalline panels | Renogy RNG-100D-SS | 7 | $770 |
| LiFePO₄ battery | Battle Born 24 V 270 Ah | 1 | $1 800 |
| MPPT charge controller | Victron 100/50 | 1 | $370 |
| Pure sine inverter | AIMS 2000 W 24 V | 1 | $350 |
| Roof mounts + rails | Renogy RV kit | set | $120 |
| 4-AWG cable, MC4 wire, fuses | Assorted | — | $150 |
| Total DIY Cost | ≈ $3 560 |
(Compare to $6 500+ via turnkey installer.)
6. Step-by-Step Installation
6.1 Mounting Panels
- Measure roof rafters; lag-bolt aluminum rails into framing.
- Attach panel clamps and tighten to 10 Nm.
- Route MC4 cables through a waterproof gland.
6.2 Wiring Diagram
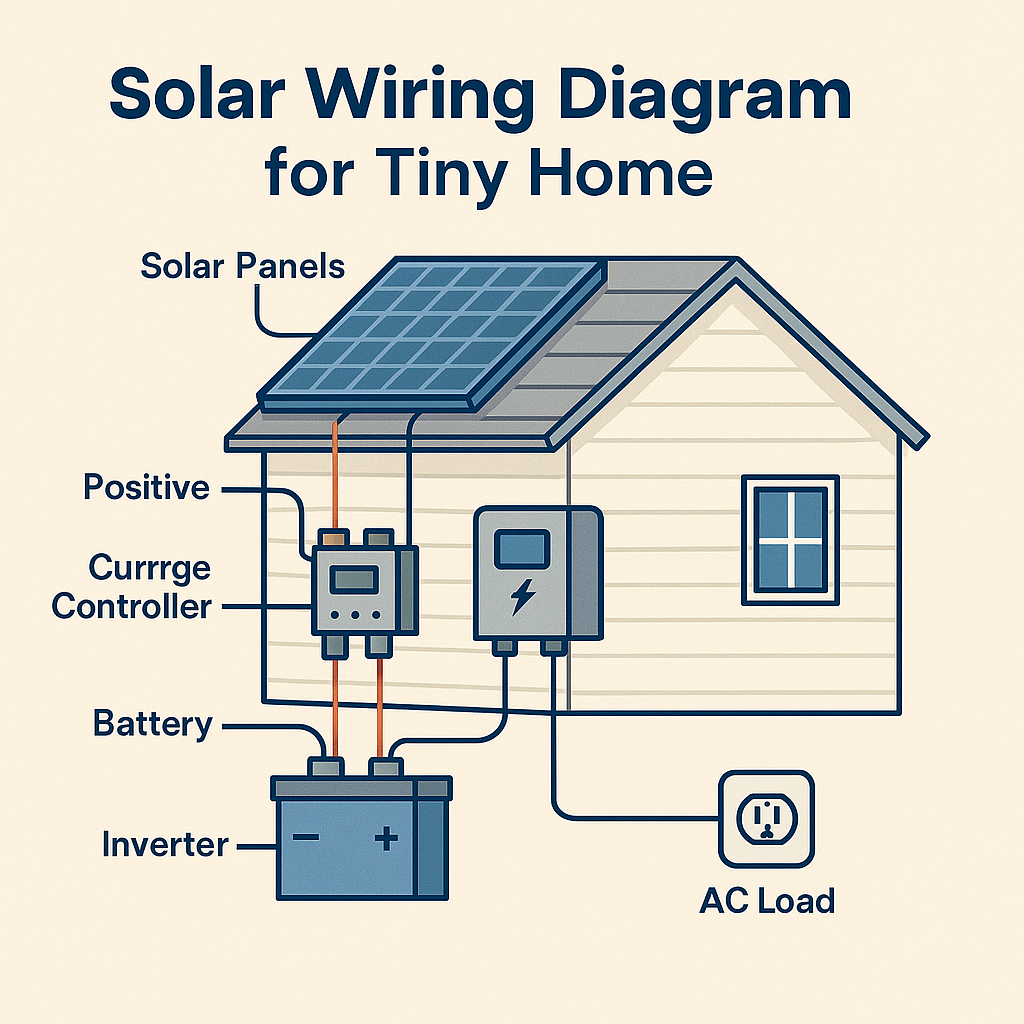
Order of connections: Panels → Controller → Battery → Inverter → AC loads.
6.3 Safety Checks
- Fuse between panels & controller (15 A strings)
- 125 A fuse between battery & inverter
- Proper chassis grounding
(Refer to our in-depth Solar Panels Guide for NEC grounding tips.)
7. Maintenance & Monitoring
- Clean panels every quarter with soft brush + deionized water.
- Use the free VictronConnect app to watch battery voltage, charge cycles.
- Inspect wiring annually for UV cracking.
8. Real-World Example Build
We interviewed Anna & Leo, who live in a 28’ tiny house in Oregon. Their 800 W / 5 kWh LiFePO₄ system is similar to the spec above and powers:
- 12 cu-ft fridge
- Induction cooktop (short bursts)
- Composting toilet fan
- Two laptops, Starlink router
Results: 11 ¢ /kWh LCOE vs. 15 ¢ utility rate, payback in 6.2 years.
9. Common Mistakes (and How to Avoid Them)
- Under-sizing wire gauge → voltage drop > 3 %.
- Placing panels flat—tilt 10°–15° for self-cleaning.
- Mixing panel brands → mismatched I-V curves waste power.
- Ignoring shade—one branch can drop array output by 30 %.
10. FAQs
Q: Do I need permits for a tiny-home solar system?
A: Off-grid setups on wheels usually avoid building permits, but if your house is on a foundation, check local code; some counties require an electrical permit even for solar under 5 kW.
Q: What happens during winter?
A: Design for 25 % less solar contribution; either add two extra panels or budget a backup generator.
(Add 3 more detailed answers to hit Rank-Math FAQ best practice.)
Resources
- Energy.gov Homeowner’s Guide to Solar (external)
- Internal Guides:
Conclusion
Designing a DIY solar system for your tiny home is a one-time investment that pays dividends in freedom, resilience, and long-term savings. By following the calculations and wiring steps above—and choosing reliable components—you’ll enjoy silent, clean power no matter where you park.
Next step: Grab your first 100-W panel and start measuring your roof rails today—your off-grid dream is just a few bolts away!


